SAM2をローカルGPU環境で動かす手順 (FastAPI + インタラクティブUI)
はじめに#
画像処理に、セグメンテーション(領域分割)という古くから研究されている技術が有ります。要は、画像に対して特定の領域を切り出す技術なのですが、様々な分野から自動化を切望されていた技術の一つです。
さて、そんな中、2023年4月にMeta社からSAM(Segmentation anything) という技術が発表されました。今までのものと比べ、“何でも分割"でき、マルチモーダルな入力に対応した画期的な技術で話題となりました。トレーニングデータも巨大、加えて商業フリーという形も有り、あっという間に話題になりました。 最近では動画も対応できるSAM2という形で配信されています。静止画性能について、SAM2は前バージョンに比べ若干早くなっているようです。
今回はこのSegmentation anythingを使って、ローカルでセグメンテーションを構築し、実行してみようかと思います。なお、すでにMeta社がDemoをオンラインで提供しているので、試すだけならそちらを利用しましょう。なお、動画のデモはこちらとなります。
Metaのオンラインデモは手軽ですが、プライバシーが気になる画像を扱いたい、バッチ処理で性能を測りたい、独自のアプリケーションに組み込みたいといったニーズには応えられません。この記事では、そうした方々に向けて、ローカルGPU環境でSAM2をセットアップし、インタラクティブに試せるWeb UIを構築する手順を解説します。
今回のソースコードはGithubにあげてあります。
SAM2 を 早速使ってみる。#
SAM2を公式がプログラムが提供しています。
このプログラムをベースにエンジンを作ります。最後、ここで使ったコードはGithubを参考ください。
今回はRyeを使って仮想環境を構築しています。RyeはPythonの仮想環境を管理するツールで、PyTorchのGPU環境を構築することができます。pyproject.tomlは次のようになります。
[project]
name = "segment2"
version = "0.1.0"
description = "Add your description here"
dependencies = [
    "huggingface-hub>=0.29.3",
    "torch>=2.6.0",
    "image>=1.5.33",
    "sam2>=1.1.0",
    "matplotlib>=3.10.1",
    "opencv-contrib-python>=4.11.0.86",
    "fastapi>=0.115.12",
    "uvicorn[standard]>=0.34.0",
    "python-multipart>=0.0.20",
    "opencv-python-headless>=4.11.0.86",
]
...
pipでやりたい方は、上記のライブラリを参考にインストールしてください。
エンジンの作成#
sam_engine.pyというファイルを定義します。なお、SAMはGPUではなくCPUでも演算可能ですが今回GPUを使うことを前提とします。
# 使用するモデルを選択 (tinyの方が精度は悪いがサイズは小さい)
SAM2_MODEL_NAME = "facebook/sam2-hiera-tiny"
# SAM2_MODEL_NAME = "facebook/sam2-hiera-large"

class Sam:
    def __init__(self):
        """SAM2 Predictor のインスタンスを作成する (FastAPI起動時)"""
        device = torch.device("cuda")
        if device.type == "cuda":
            torch.autocast("cuda", dtype=torch.bfloat16).__enter__()
            # turn on tfloat32 for Ampere GPUs (https://pytorch.org/docs/stable/notes/cuda.html#tensorfloat-32-tf32-on-ampere-devices)
            if torch.cuda.get_device_properties(0).major >= 8:
                torch.backends.cuda.matmul.allow_tf32 = True
                torch.backends.cudnn.allow_tf32 = True
        else:
            raise NotImplementedError
        try:
            self.predictor = SAM2ImagePredictor.from_pretrained(SAM2_MODEL_NAME)
        except:
            self.predictor = None
上記クラスがSAM2のエンジンです。マスクを予測するpredict_mask関数を定義します。
    def predict_mask(
        self, image_path: str, input_points_list: list, input_labels_list: list
    ):
        # print(input_points_list)
        # print(input_labels_list)
        """指定された画像と点を使ってマスクを予測する (元のサンプルに近づける)"""
        if self.predictor is None:
            # load_model が FastAPI 起動時に呼ばれているはずだが、念のためチェック
            raise RuntimeError(
                "SAM2 predictor is not initialized. Application might not have started correctly."
            )

        try:
            img = Image.open(image_path).convert("RGB")
            img_array = np.array(img)
            image_np_bgr = cv2.cvtColor(img_array, cv2.COLOR_RGB2BGR)

            input_point_np = np.array(input_points_list, dtype=np.float32)
            input_label_np = np.array(input_labels_list, dtype=np.int32)

            # --- 元のサンプルのデバイス設定、autocast/TF32設定を推論前に適用 ---

            with torch.inference_mode(), torch.autocast("cuda", dtype=torch.bfloat16):
                self.predictor.set_image(img_array)
                masks, scores, logits = self.predictor.predict(
                    point_coords=input_point_np,
                    point_labels=input_label_np,
                    multimask_output=True,
                )
                sorted_ind = np.argsort(scores)[::-1]
                masks = masks[sorted_ind]
                scores = scores[sorted_ind]
                logits = logits[sorted_ind]

                if len(scores) == 0:
                    print("Warning: No masks predicted.")
                    # マスクが見つからなかった場合、元画像を返す
                    return image_np_bgr, 0.0

                # 最もスコアの高いマスクを選択
                best_mask_idx = np.argmax(scores)
                best_mask_np = masks[best_mask_idx]
                best_score = scores[best_mask_idx]

                # マスクを元画像(BGR)に適用
                result_image_np = self.apply_mask_to_image(
                    image_np_bgr, best_mask_np, borders=True
                )

                return result_image_np, float(best_score)

        except FileNotFoundError:
            print(f"Error: Image file not found at {image_path}")
            return None, None
        except Exception as e:
            print(f"Error during prediction in sam_engine: {e}")
            import traceback

            traceback.print_exc()
            return None, None
類推する部分など、公式に定義されているpredict関数を利用しています。上記中で、マスク画像を生成しているapply_mask_to_image 関数を定義しまが、その内容は次のとおりです。これは元画像にマスクを適用するための関数で、cv2 を使っています。
    def apply_mask_to_image(
        self, image_np_bgr, mask_np, random_color=False, borders=True
    ):
        """マスクを画像に重ね合わせる (OpenCVを使用 - この部分は変更なし)"""
        if mask_np.dtype != bool:
            mask_boolean = mask_np.astype(bool)
        else:
            mask_boolean = mask_np

        if random_color:
            color = np.array(
                [
                    np.random.randint(0, 256),
                    np.random.randint(0, 256),
                    np.random.randint(0, 256),
                ],
                dtype=np.uint8,
            )
        else:
            color = np.array([255, 144, 30], dtype=np.uint8)  # BGR: 青っぽい色

        h, w = mask_boolean.shape[-2:]
        mask_colored = np.zeros((h, w, 3), dtype=np.uint8)
        mask_colored[mask_boolean] = color

        alpha = 0.5
        blended = cv2.addWeighted(image_np_bgr, 1.0, mask_colored, alpha, 0)

        if borders:
            try:
                mask_uint8 = mask_boolean.astype(np.uint8) * 255
                contours, _ = cv2.findContours(
                    mask_uint8, cv2.RETR_EXTERNAL, cv2.CHAIN_APPROX_SIMPLE
                )
                cv2.drawContours(blended, contours, -1, (255, 255, 255), thickness=2)
            except Exception as e:
                print(f"Warning: Failed to draw contours: {e}")

        return blended
エンジンはこれだけです。フロント側からPos/Negの点座標と、ラベル番号(1: positive, 0: negative)を受取り、それらをpredict関数に突っ込んでいるだけです。 Negativeは含まない領域を出力します。
FastAPIでWeb APIを構築#
SAMエンジンを動かすバックエンドとしてFastAPIを利用します。ブラウザのフロントエンドからリクエストを受け取り、先に定義したエンジンにおくり、セグメンテーション結果を返すことができます。
主要なポイントは以下の通りです。
モデルのロード: FastAPIの
lifespanイベントハンドラを使用して、アプリケーション起動時にSAMモデル (Samクラスのインスタンス) を一度だけロードし、GPUメモリ上に保持します。これにより、リクエストごとにモデルをロードするオーバーヘッドを避けることができます。# main.py (抜粋) from contextlib import asynccontextmanager from sam_engine import Sam import torch sam = None @asynccontextmanager async def lifespan(app: FastAPI): print("Loading SAM model...") global sam sam = Sam() # ここでインスタンス化 & モデルロード # 必要に応じてCUDAキャッシュクリアなど yield print("Application shutdown.") app = FastAPI(lifespan=lifespan)ルートエンドポイント (
/):GETリクエストを受け付けます。- フロントエンドの
index.htmlを返します。これにより、ユーザーはブラウザで操作画面にアクセスできます。
# main.py (抜粋)
from fastapi.responses import HTMLResponse
from fastapi.templating import Jinja2Templates

templates = Jinja2Templates(directory="frontend")

@app.get("/", response_class=HTMLResponse)
async def read_root(request: Request):
    """フロントエンドのHTMLを返す"""
    return templates.TemplateResponse("index.html", {"request": request})
画像アップロードエンドポイント (
/upload/):POSTリクエストを受け付けます。- フォームデータとして送信された画像ファイル (
UploadFile) を受け取ります。 - 画像をサーバー上の
UPLOAD_DIRにユニークなファイル名で保存します。 - 保存したファイル名と、画像の元の幅・高さをJSON形式で返します。これはフロントエンドで座標計算を行うために必要です。
# main.py (抜粋)
from fastapi import FastAPI, File, UploadFile, HTTPException
from fastapi.responses import JSONResponse
from PIL import Image
import io, os, uuid

UPLOAD_DIR = "backend/uploaded_images" # 保存先

@app.post("/upload/")
async def upload_image(file: UploadFile = File(...)):
    # ... (ファイル形式チェック、保存処理) ...
    contents = await file.read()
    # ... (ファイル書き込み) ...
    img = Image.open(io.BytesIO(contents))
    width, height = img.size
    return JSONResponse(
        content={"filename": filename, "width": width, "height": height}
    )
    # ... (エラーハンドリング) ...
セグメンテーション実行エンドポイント (
/segment/):POSTリクエストを受け付けます。- リクエストボディとしてJSONデータ (
SegmentationRequestモデル) を受け取ります。これには、処理対象のfilename、クリックされた点の座標リストpoints([[x1, y1], ...])、および各点に対応するラベルリストlabels([1, 0, ...]) が含まれます。 - 受け取った情報を使って、ロード済みの
samインスタンスのpredict_maskメソッドを呼び出し、セグメンテーションを実行します。 - 結果として得られたマスク適用済み画像 (NumPy配列) をJPEG形式にエンコードし、さらにBase64エンコードしてJSONレスポンス (
result_image) に含めます。予測スコア (score) も一緒に返します。
# main.py (抜粋)
from pydantic import BaseModel
import numpy as np
import cv2, base64

class SegmentationRequest(BaseModel):
    filename: str
    points: list[list[float]]
    labels: list[int]

@app.post("/segment/")
async def segment_image(request_data: SegmentationRequest):
    filepath = os.path.join(UPLOAD_DIR, request_data.filename)
    # ... (ファイル存在チェック、ポイント/ラベル検証) ...

    input_points_np = np.array(request_data.points, dtype=np.float32)
    input_labels_np = np.array(request_data.labels, dtype=np.int32)

    # SAMエンジンで予測を実行
    global sam
    result_image_np, score = sam.predict_mask(
        filepath, input_points_np.tolist(), input_labels_np.tolist()
    )

    # ... (エラーハンドリング: result_image_np is None) ...

    # 結果画像をBase64エンコード
    _, buffer = cv2.imencode(".jpg", result_image_np)
    img_base64 = base64.b64encode(buffer).decode("utf-8")

    return JSONResponse(
        content={
            "result_image": f"data:image/jpeg;base64,{img_base64}",
            "score": float(score) if score is not None else None,
        }
    )
    # ... (エラーハンドリング) ...
これらのエンドポイントにより、フロントエンドとバックエンドが連携し、インタラクティブなセグメンテーションが可能になります。
完全な main.py のコードは、提供されているGitHubリポジトリで確認できます。
フロントエンドの実装 (JavaScript抜粋)#
フロントエンドでは、HTMLファイルを用意します。frontendというフォルダを作り、そこにindex.htmlを配置します。
mkdir frontend
touch frontend/index.html
HTMLで画像アップロード用の <input type="file">、画像表示とクリック検出用の <img> とコンテナ <div>、ポジティブ/ネガティブ選択用のラジオボタン、セグメンテーション実行ボタン、結果表示用の <img> などを用意します。
それにともなったjsを書いていきます。
以下は、それらのHTML要素と連携するJavaScriptコードの主要部分です。画像のアップロード、クリック座標の取得と整形、そしてバックエンドAPIとの通信(セグメンテーション要求と結果表示)を担当します。
// --- 主要なDOM要素を取得 ---
const imageUpload = document.getElementById('image-upload');
const imageContainer = document.getElementById('image-container');
const uploadedImage = document.getElementById('uploaded-image');
const segmentBtn = document.getElementById('segment-btn');
const resultImage = document.getElementById('result-image');
const resultScore = document.getElementById('result-score');
// (他の要素取得は省略)

// --- 状態変数 ---
let currentFilename = null;     // サーバー上の画像ファイル名
let imageOriginalWidth = 0;     // 元画像の幅
let imageOriginalHeight = 0;    // 元画像の高さ
let points = [];                // クリックされた点の情報 [{originalX, originalY, label}, ...]


// --- 1. 画像アップロード処理 (抜粋) ---
imageUpload.addEventListener('change', async (event) => {
    const file = event.target.files[0];
    if (!file) return;
    // (UIリセット処理などは省略)

    const formData = new FormData();
    formData.append('file', file);

    try {
        // FastAPIの /upload/ エンドポイントに画像をPOST
        const response = await fetch('/upload/', { method: 'POST', body: formData });
        if (!response.ok) throw new Error('Upload failed');

        const data = await response.json();
        currentFilename = data.filename;      // ファイル名を取得
        imageOriginalWidth = data.width;    // 元画像のサイズを取得
        imageOriginalHeight = data.height;

        // 画像プレビュー表示 (FileReaderを使った処理は省略)
        // ... uploadedImage.src = ...
        console.log(`Uploaded: ${currentFilename}, Size: ${imageOriginalWidth}x${imageOriginalHeight}`);

    } catch (error) {
        console.error('Upload error:', error);
        // (エラー表示処理は省略)
    }
});

// --- 2. 画像クリック時の座標取得・保存 (抜粋) ---
imageContainer.addEventListener('click', (event) => {
    if (!currentFilename || !uploadedImage.complete) return; // 画像ロード完了前にクリックされるのを防ぐ

    const rect = imageContainer.getBoundingClientRect();
    const displayWidth = uploadedImage.offsetWidth;
    const displayHeight = uploadedImage.offsetHeight;

    // クリック座標 (表示されている画像に対する相対座標)
    const clickX = event.clientX - rect.left;
    const clickY = event.clientY - rect.top;

    // 元画像における座標にスケーリング
    const scaleX = imageOriginalWidth / displayWidth;
    const scaleY = imageOriginalHeight / displayHeight;
    const originalX = Math.round(clickX * scaleX);
    const originalY = Math.round(clickY * scaleY);

    // 画像範囲外なら無視
    if (originalX < 0 || originalX >= imageOriginalWidth || originalY < 0 || originalY >= imageOriginalHeight) return;

    // 選択されているラベル (1: Positive, 0: Negative) を取得
    const selectedLabel = parseInt(document.querySelector('input[name="click-mode"]:checked').value);

    // 点の情報を保存 (UIに点を描画する処理は省略)
    points.push({ originalX, originalY, label: selectedLabel });
    console.log('Point added:', { originalX, originalY, label: selectedLabel });
    segmentBtn.disabled = false; // 実行ボタンを有効化
});

// --- 3. セグメンテーション実行 (抜粋) ---
segmentBtn.addEventListener('click', async () => {
    if (!currentFilename || points.length === 0) return;
    // (ローディング表示などのUI制御は省略)

    // バックエンドAPIに送るデータを作成
    const requestData = {
        filename: currentFilename,
        points: points.map(p => [p.originalX, p.originalY]), // [[x1, y1], [x2, y2], ...]
        labels: points.map(p => p.label),                   // [1, 0, ...]
    };

    try {
        // FastAPIの /segment/ エンドポイントにJSONデータをPOST
        const response = await fetch('/segment/', {
            method: 'POST',
            headers: { 'Content-Type': 'application/json' },
            body: JSON.stringify(requestData),
        });
        if (!response.ok) throw new Error('Segmentation failed');

        const data = await response.json();
        // 結果画像(Base64)を表示
        resultImage.src = data.result_image;
        resultImage.classList.remove('hidden');
        // スコア表示
        resultScore.textContent = data.score ? `予測スコア: ${data.score.toFixed(3)}` : 'スコアなし';

    } catch (error) {
        console.error('Segmentation error:', error);
        // (エラー表示処理は省略)
    } finally {
        // (ローディング解除などのUI制御は省略)
    }
});

// --- 4. 点をクリアする処理 (抜粋) ---
function clearPoints() {
    points = []; // 配列を空にする
    // (UI上のマーカー削除処理は省略)
    console.log('Points cleared');
    segmentBtn.disabled = true;
}

// clearPointsBtn のクリックイベントリスナーで clearPoints() を呼び出す (コード省略)
繰り返しになりますが、実際に動くコードはGithubにあげてあります。
ローカルで動かしてみる#
それでは早速起動してみましょう。今回はRye を使って動かします。
rye run uvicorn main:app --host 0.0.0.0 --port 8000
これで立ち上げあとは画像を加えて,セグメンテーションしたい領域を選択します。
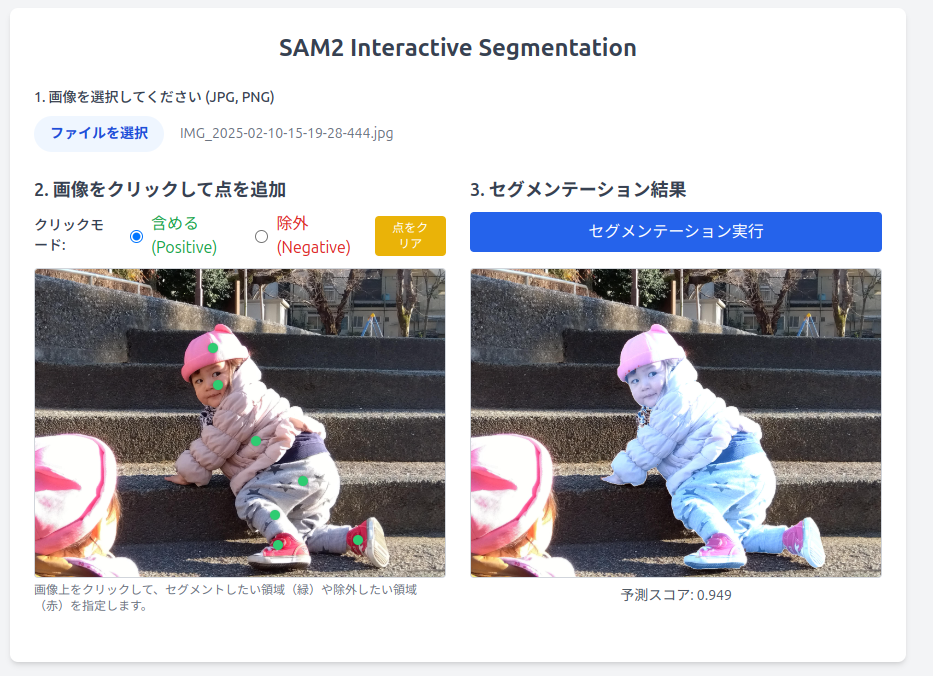
上記のような画面が結果ですが、セグメンテーションが出来ていることが確認できます。
今回はTinyモデルで検証しましたが、GPUに余裕がある方はlargeなどを使っていきましょう。 ちなみにVRAMの使用容量ですが、 sam2.1_hiera_tiny, sam2.1_hiera_small, sam2.1_hiera_base_plus, sam2.1_hiera_large の4つがあり、一番小さいモデルと大きいモデルを比較すると次のとおりです。
| 名前 | 使用中VRAM |
|---|---|
| facebook/sam2-hiera-tiny | 1.5GB |
| facebook/sam2-hiera-large | 3.2GB |
ですので4GBのGPUでもギリギリLargeで使用ができそうです。
まとめ#
今回は、MetaのSegment Anything Model (SAM2) をローカルのGPU環境でセットアップし、FastAPIとシンプルなWeb UIを使ってインタラクティブにセグメンテーションを実行する手順を解説しました。
オンラインデモとは異なり、ローカル環境では以下のようなメリットがあります。
- プライベートな画像を外部にアップロードせずに試せる。
- 処理時間を計測し、特定のGPUでの性能を評価できる。
- バッチ処理や他のアプリケーションへの組み込みなど、より高度な利用に向けた検証ができる。
今回構築したシステムは基本的なものですが、これをベースに、矩形(バウンディングボックス)入力への対応、複数オブジェクトの同時指定、あるいは動画への適用など、さらに発展させることも可能です。
SAM/SAM2は非常に強力なツールであり、ローカルで動かすことでその可能性をさらに引き出すことができます。この記事が、皆さんの研究開発やプロジェクトの一助となれば幸いです。コード全体はこちらで公開しています。

画像処理エンジニア。組み込みソフト出身。 株式会社モルフォにてR&D部門、主に機械学習業務に携わり、顔認識&顔検出のアルゴリズム開発に従事。国内特許数件、国際特許1件。 モルフォ社退社後、株式会社Dynaptico創業(CEO)。アメリカ人、スウェーデン人と3名とフードデリバリーサイトmaishoku.comを立ち上げる。社長業の他、開発業務においてバックグラウンド関連全般(Djangoを用いいたバックエンドサーバ&APIサーバーの作成、 リバースプロキシなどの負荷分散サーバ関連、OCRプログラムの作成、CISCOルータの管理, 、seleniumを用いたテストサーバーの構築、Androidアプリの開発等々)に携わる。 2019年DynapticoのCEOを辞職。 2020年2月にComputer Scienceに特化した株式会社OctOpt創業。 OSはUbuntu。Appleが苦手。Swiftのバージョンアップ対応とか死ぬほど嫌い。 Python/C++/C Twitter: @rocky_house シフト自動調整スケジュールサイトをVue.js+graphene djangoで構築. https://www.allshifter.com https://iamfax.com